Laundry Room Pegboard: How to Plan and Hang One
A step-by-step plan for a pegboard that holds light laundry tools: what to hang, which panel suits a humid room, how to lay it out on the floor first, and what to check before fixing it to the wall.
At a glance
What you need
- Pegboard panel in hardboard, metal or plastic
- Hooks, cups and small shelves made for that panel
- Spacers or frame supplied by the panel maker
- Fixings suited to your wall type
- Stud and cable detector
- Level, pencil and tape measure
- Tags or a paint marker for outlines
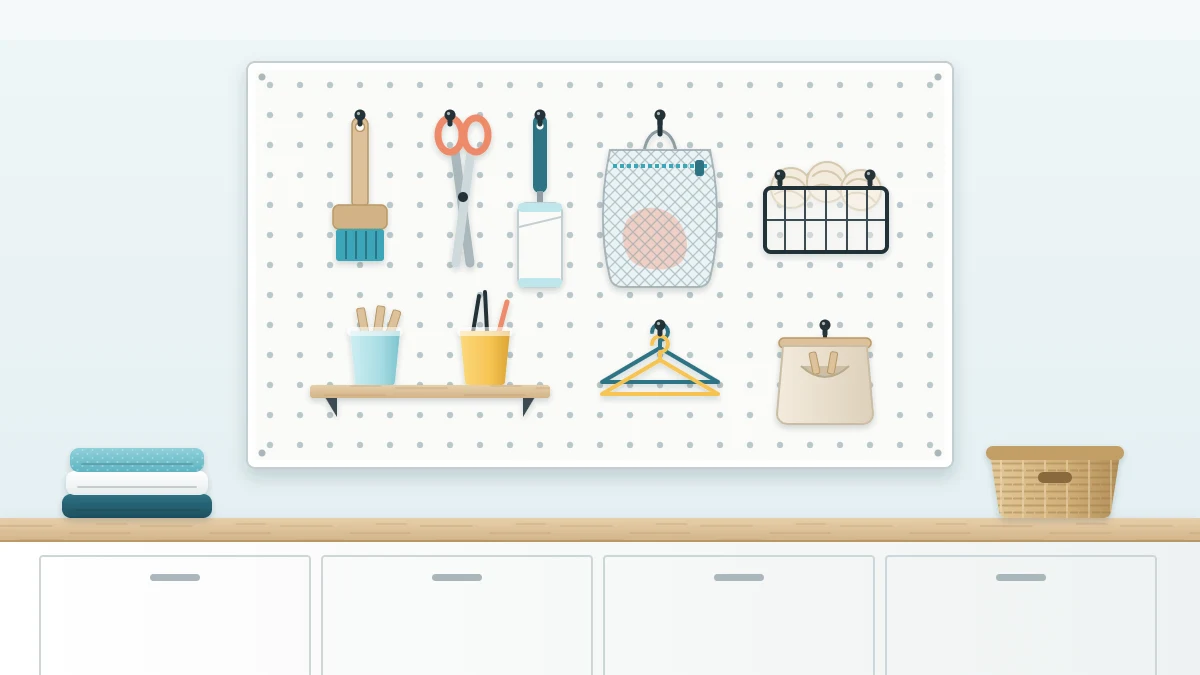
Small laundry tools are the things that never seem to have a place: the lint roller, the scissors for loose threads, the mesh bags, the brush you use on collars. A laundry room pegboard gives each of them a visible hook on the wall, and the layout can change whenever your habits do.
The project is simple, but the order matters. Plan what will hang and where the panel can go before you pick up a drill, and leave the fixing details to the panel maker’s instructions.
Step 1: List what will hang
A pegboard is for light tools and accessories. Write the list first, because it decides the panel size and the hooks you need. Typical items:
- Clothes brush and lint roller
- Scissors and a small sewing kit
- Mesh wash bags
- Spare hangers
- A clothespin bag
- A small wire basket for dryer balls
Laundry products are not on the list. Bottles and boxes are heavy, and they belong in their original containers on a shelf or in a cabinet, up high or latched if children or pets use the room. If you want a dedicated spot for treating marks before washing, the guide to a stain treatment station shows how to set one up, and the pegboard can hold its brushes and cloths.
Step 2: Choose the panel and the spot
Pegboard panels come in three common materials:
- Hardboard: inexpensive and easy to cut. Unsealed hardboard can swell or sag in a humid room, so look for a sealed or painted panel.
- Metal: rigid and unbothered by damp. Often sold in modular panels with their own hooks.
- Plastic: light, wipeable and also fine with humidity.
In a laundry room that gets steamy, metal or plastic usually copes better. Whatever you choose, buy hooks made for that panel, since hole sizes and spacing differ.
For the location, look for a free stretch of wall at a comfortable height, such as above a counter or beside a door. Keep it away from the washer and dryer connections, the water shut-off valves and anything else you may need to reach. A panel about 24 in (60 cm) wide holds a surprising amount; measure the free wall before you settle on a size.
Step 3: Plan the layout on the floor
Lay the panel flat on the floor and arrange the real items on it. Move things around until each one has room to be lifted off without knocking its neighbor. Put the tools you reach for most where your hand will naturally land, and group things that are used together.
When the arrangement works, set the hooks roughly in position and take a picture with your phone. That picture is your plan for later.

Step 4: Find the fixing points
Hold the panel against the wall, or mark its outline lightly in pencil, and work out where the fixings can go. Locate the studs if you have a framed wall, and check for pipes and cables before drilling. Laundry walls often carry both water lines and wiring, sometimes in places you would not expect.
A stud and cable detector helps, but it is not perfect. If you are unsure what is behind the wall, or the wall is tile, masonry or something you have not drilled before, ask a professional.
Good to know
Every panel has a stated load rating, and it depends on the fixings and the wall type. Follow the panel maker’s fixing instructions, and keep heavy or liquid items off the board.
Step 5: Mount the panel
Hooks need a little space behind the panel to seat properly. Panel makers handle this in different ways: some supply spacers, some use a frame or furring strips, and many metal panels have folded edges that create the space on their own. Use what the maker supplies or specifies.
Mount the panel level, following the maker’s fixing instructions for your wall type. Once it is up, press on each corner. It should not rock, flex or pull away. If it does, stop and recheck the fixings before anything is hung on it.
Step 6: Fit the hooks and hang the items
Open the picture you took and rebuild the layout on the wall. A few guidelines keep the board useful:
- Place the most-used tools at eye level and within easy reach.
- Put occasional items higher up and light baskets or small shelves lower down.
- Use a cup or a small basket for loose things such as clothespins, safety pins and dryer balls.
- Leave some empty holes. A full board has no room for the next tool.
Hang each item and take it off again once or twice. If a hook lifts out with the tool, swap it for a locking style or add the small clips many makers sell for that purpose.
Tip
Live with the layout for a week before you mark positions. The first arrangement is rarely the final one.
Step 7: Outline or tag the positions
A pegboard stays tidy when everyone can see where a missing tool belongs. There are two simple ways to show that:
- Outlines: trace around each tool with a paint marker, or cut its shape from colored adhesive film and stick it behind the hook.
- Tags: add a small tag beside each hook or on each basket with the name of the item.
If you already label shelves and bins in the room, use the same style here; the guide to a simple laundry room labeling system covers formats that hold up in humidity.
Options for renters and tricky walls
If you cannot drill, a pegboard can still work. A framed panel can lean on a counter against the wall, as long as it sits steadily and is not near the edge. A light panel can also hang from an over-door bracket made for the purpose, used within the bracket’s stated load rating.
These versions hold less than a wall-mounted panel, so keep them to the lightest items. If a pegboard does not suit the room at all, a rail with hooks or a few adhesive hooks used as their instructions say may do the same job; the overview of laundry room wall storage compares the choices.
Whichever version you choose, review it every few months. Take off what nobody uses, move what is awkward to reach and keep a couple of spare hooks in a cup on the board for the next change.
Frequently asked questions
What can I hang on a laundry room pegboard?
Light tools and accessories: a clothes brush, lint roller, scissors, mesh wash bags, spare hangers, a clothespin bag and a small basket of dryer balls. Laundry products do not belong on a pegboard. They are heavy and stay in their original containers on a shelf or in a high or latched cabinet.
Which pegboard material is best for a laundry room?
Metal and plastic panels generally cope better with a humid room than unsealed hardboard, which can swell or sag when damp. A sealed or painted hardboard panel is a reasonable budget choice in a well-ventilated room. Buy hooks made for the panel you choose, because hole sizes differ.
Can I have a pegboard without drilling into the wall?
Yes, in a lighter form. A framed panel can lean steadily on a counter against the wall, or a light panel can hang from an over-door bracket used within its stated load rating. Both hold less than a wall-mounted panel, so keep them to the lightest tools.